Table of Contents Show
The holiday season is here, and that means it’s time to get festive with your nails! Whether you want to go for a classic red and green combo, a sparkly glitter manicure, or a chic winter-inspired design, there are plenty of easy and fun nail art ideas to try at home. You don’t need to be a pro to create these stunning looks, all you need are some basic tools, nail polish colors, and a bit of creativity. Here are 45 simple festive nail art ideas to inspire you this Christmas, along with some tips on how to achieve them.
01 | Seeing Stars

If you love starry nights, this nail art idea is for you. All you need is a dark blue or black base coat, a silver or gold glitter polish, and a dotting tool or toothpick. Apply the base coat and let it dry completely. Then, use the dotting tool or toothpick to create small stars with the glitter polish. You can make them as dense or sparse as you like, depending on how much sparkle you want.
02 | Festive French

A French manicure is always elegant, but you can make it more festive by adding some red tips and a swipe of multicolored glitter polish. Start by applying a clear base coat and let it dry. Then, use a thin brush or tape to create the red tips. Finish with a layer of glitter polish over the entire nail for some extra shine.
03 | Candy Cane Swirls

This nail art idea is perfect for candy cane lovers. You’ll need a white base coat, a red polish, and a striping brush or tape. Apply the white base coat and let it dry. Then, use the striping brush or tape to create thin red stripes across the nail, alternating the direction of the stripes for a swirl effect. You can also add some silver glitter polish for some extra sparkle.
04 | Christmas Lights

This nail art idea is super cute and easy to do. You’ll need a black base coat, some colorful polishes, and a dotting tool or toothpick. Apply the black base coat and let it dry. Then, use the dotting tool or toothpick to create small dots with the colorful polishes along the edge of the nail, leaving some space between them. Connect the dots with thin black lines to create the string of lights.
05 | Red Ombré

If you want a simple but stunning nail art idea, try this red ombré manicure. You’ll need a clear base coat, a light red polish, a dark red polish, and a makeup sponge. Apply the clear base coat and let it dry. Then, apply both red polishes on the sponge, overlapping them slightly. Dab the sponge on your nails, creating a gradient effect from light to dark. Repeat until you get the desired intensity.
06 | Frosted Ice

Sources:
This nail art idea is perfect for winter lovers. You’ll need a white base coat, a blue polish, and some iridescent glitter polish. Apply the white base coat and let it dry. Then, use a thin brush or tape to create thin blue stripes across the nail, leaving some white space between them. Finish with a layer of iridescent glitter polish over the entire nail for some frosty sparkle.
07 | Let It Snow

Sources:
This nail art idea is adorable and easy to do. You’ll need a light blue base coat, a white polish, and some snowflake stickers or decals. Apply the light blue base coat and let it dry. Then, use the white polish to create small dots on your nails for snowflakes. You can also add some snowflake stickers or decals for some extra detail.
08 | All That Glitters Is Gold

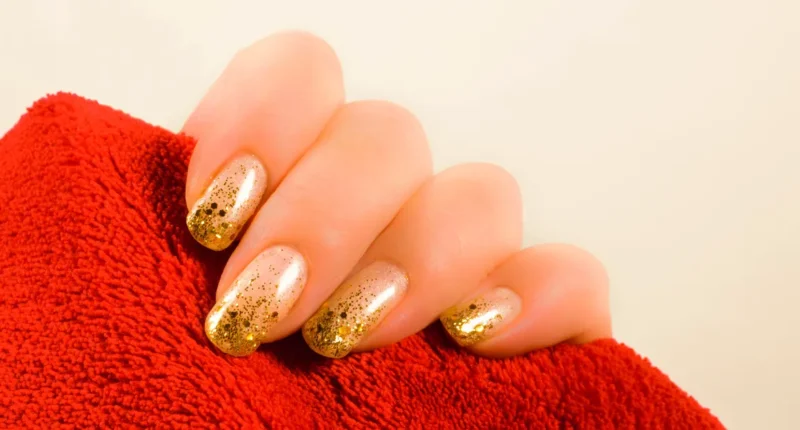
If you want to add some glamour to your nails, try this gold glitter manicure. You’ll need a clear base coat, a gold glitter polish, and some gold studs or rhinestones. Apply the clear base coat and let it dry. Then, apply two or three coats of gold glitter polish for full coverage. While the polish is still wet, add some gold studs or rhinestones on your accent nails for some extra bling.
09 | Cozy Sweater Pattern

Create the cozy feel of a Christmas sweater on your nails with this design. Start with a red or green base coat. Once it’s dry, use a thin brush and white polish to add sweater-like patterns – think zigzags, diamonds, and lines. It’s a festive and fun way to bring some holiday cheer to your fingertips.
10 | Holly Accents

This look is simple yet festive. Paint your nails with a bright red base coat and let it dry. Then, using a dotting tool or a toothpick, add small leaves with green polish and tiny red dots for berries to mimic holly. It’s a subtle nod to the holiday season.
11 | Snowy Mountain Peaks

For a winter wonderland effect, use a light blue or gray polish as the base. Once it’s dry, use white polish to create jagged, snow-covered mountain peaks at the tips of your nails. Add a top coat for a glossy finish.
12 | Santa’s Belt

This is a cute and playful design. Paint your nails with a bright red polish. Once it’s dry, use black polish to draw a thin horizontal line across the middle of each nail. Add a small square of gold or yellow polish over the black line to mimic Santa’s belt buckle.
13 | Glittery Green Trees

Start with a dark green base coat. Once it’s dry, use a thin brush or toothpick to draw abstract Christmas trees with a glittery green or gold polish. This adds a twinkling effect to your nails, perfect for the holiday season.
14 | Elegant Snowflakes

This sophisticated design requires a steady hand. Paint your nails with a dark blue or black polish for the base. Once dry, use a white or silver polish to draw delicate snowflakes on one or two nails as accents. This design pairs well with a more neutral outfit.
15 | Shimmering Midnight Sky

Perfect for New Year’s Eve, this design involves a dark navy or black base coat, topped with a shimmering silver or gold polish. The combination gives the effect of a starry night sky, elegant and festive.
16 | Winter Berries

Start with a nude or light pink base coat. Once it’s dry, use a red polish to dot small berries on your nails. Add tiny green leaves for a complete berry look. It’s a minimalist design that’s still very much in the holiday spirit.
17 | Golden Stripes

This chic design is easy to achieve. Paint your nails with your choice of base color. Once dry, use thin adhesive tape to create stripes, and paint over them with a gold polish. Remove the tape to reveal clean, golden stripes.
18 | New Year’s Fireworks

For a celebratory look, begin with a black or dark blue base coat. Then, using a thin brush or dotting tool, create bursts of different colored polishes (like gold, silver, and red) to resemble fireworks.
19 | Winter Wonderland

Embrace the beauty of a snowy landscape with this design. Paint your nails with a shimmering white or light blue polish. Once dry, add delicate silver glitter or tiny white dots to represent falling snow. It’s like having a mini winter wonderland at your fingertips.
20 | Peppermint Twists

This candy-inspired design is both fun and festive. Alternate red and white stripes on your nails, twisting them slightly for that classic peppermint look. You can use tape to achieve clean, straight lines. Finish with a shiny top coat for a glossy effect.
21 | Sparkling New Year Countdown

Sources:
Perfect for New Year’s celebrations, start with a black base coat. Once it’s dry, use a gold or silver polish to add numbers from a countdown (10, 9, 8, etc.) on each nail. Add some glitter or tiny rhinestones to make them pop.
22 | Icy Blue Flakes

For a cool winter vibe, use a pale blue polish as your base. Once dry, use a glittery white or silver polish to create flake-like patterns. The contrast between the blue and the shimmering flakes creates a stunning icy effect.
23 | Elegant Pearl Accents

Begin with a base of your choice, ideally a pastel or nude shade. Once dry, add small pearl stickers or decals on each nail, or just as an accent on one nail. This simple addition gives a touch of elegance to your festive look.
24 | Poinsettia Petals


Sources:
This floral-inspired design is perfect for Christmas. Start with a green base coat. Once it’s dry, use red polish to create petal shapes near the base or tips of your nails. You can add a few gold dots in the center to mimic the flower’s center.
25 | Glittery French Manicure

Upgrade the classic French manicure for the holidays. After applying your base coat, use a glittery polish for the tips instead of the traditional white. You can choose traditional Christmas colors like red, green, or gold for the tips.
26 | Rudolph Accents

A playful design for animal lovers. Paint your nails with a nude or light brown polish. Once dry, use a darker brown, red, and white polish to create Rudolph’s face and bright red nose on your accent nail.
27 | Midnight Blue Shimmer

Start with a deep blue base coat. Once dry, add a layer of shimmering blue or silver glitter polish on top. This design gives the effect of a starlit night sky, perfect for winter evenings.
28 | Christmas Ornament Inspiration

Use a variety of colors to mimic the look of Christmas ornaments. Paint each nail a different color, and then add stripes, dots, and glitter to resemble the decorations on a Christmas tree. You can also add tiny gemstones for extra sparkle.
29 | Silver Bells

Sources:
This elegant design captures the essence of holiday bells. Start with a metallic silver base coat. Once dry, use a thin brush to draw small bell shapes in gold or white. Add a tiny bow or ribbon detail at the top of each bell for a festive touch.
30 | Mistletoe Magic


Sources:
For a romantic and festive look, paint your nails a deep green. When dry, use a red polish to add small mistletoe berries, and white or light green for the leaves. You can focus the design on one nail as an accent or spread it across a few.
31 | Gingerbread Man Accents

Perfect for those who love baking during the holidays. Start with a brown base coat to represent gingerbread. Once dry, use white, red, and green polish to add details like eyes, buttons, and a smile to one or two nails.
32 | Warm Plaid

A cozy, classic winter pattern. Use a nude or light brown base, then add thin lines of red, green, and gold using a striping brush. This plaid design is reminiscent of winter scarves and cozy evenings by the fire.
33 | Champagne Toast


Sources:
Ideal for New Year’s Eve, start with a gold or champagne-colored base. Once dry, use a glittery gold or silver polish to add a bubbly effect, concentrating at the tip and fading towards the base for an ombre look.
34 | Festive Polka Dots

Sources:
Simple yet playful. Choose a base color like red, green, or gold. Once dry, add small dots of a contrasting color using a dotting tool or the tip of a toothpick. This look is easy to achieve and looks effortlessly festive.
35 | Angelic Wings

For a more delicate design, use a light pink or nude base. Then, draw angel wings in white or silver on the accent nails. You can add small rhinestones or glitter to the wings for extra sparkle.
36 | Joyful Jingle Bells

Sources:
Start with a gold or bronze base coat to represent bells. Once dry, add small black lines to mimic the top of a bell and tiny red bows. This design is festive and fun, perfect for holiday celebrations.
37 | Glistening Snowman


Create a cute snowman on your nails with a white base coat. Once dry, use black polish for eyes and buttons, orange for the carrot nose, and red or green for a scarf. This design can be a fun project, especially if you’re new to nail art.
38 | Elegant Lace

For a sophisticated look, begin with a nude or light pink base. Once dry, use a white polish to create delicate lace patterns on your nails. This design is subtle and elegant, perfect for holiday dinners or gatherings.
39 | Glowing Fireworks

Celebrate the New Year with this vibrant design. Paint your nails in a dark base color like navy or black. Once dry, use a thin brush to add bursts of colorful polishes, resembling fireworks in the night sky. Add a touch of glitter for extra sparkle.
40 | Winter Knit

Mimic the look of a cozy winter sweater on your nails. Start with a base color of your choice. Once it’s dry, use a contrasting color and a dotting tool to create a knit pattern, with small lines and dots arranged in rows.
41 | Sparkling Snow Drifts

Sources:
For a wintry, shimmering effect, use a white or light blue base. Once dry, apply a sheer coat of iridescent or glitter polish at the tips, gradually fading down to mimic drifting snow.
42 | Holiday Tartan

Channel the classic holiday pattern. Paint your nails with a red base coat. Once dry, add thin green and gold stripes using a striping brush, creating a tartan pattern. This look is both festive and fashionable.
43 | North Star Accent

Sources:
Add a celestial touch with this design. Choose a dark base color like navy or black. On your accent nail, use a gold or silver polish to draw a prominent North Star design. You can add small dots around it to enhance the starry night effect.
44 | Elegant Ice Crystals

Sources:
For a frosty and sophisticated look, start with a clear or pale blue base. Once it’s dry, use a white or silver polish to draw intricate ice crystal designs on one or two accent nails. This minimalist design is subtly festive.
45 | Countdown Clock

Perfect for New Year’s Eve, this design involves painting your nails in a metallic base color like silver or gold. Once dry, use black or dark gray polish to add clock faces showing different times, symbolizing the countdown to the New Year.
With these 45 festive nail art ideas, you can enjoy the festive spirit right at your fingertips. Whether you prefer subtle elegance or bold and playful designs, there’s something here for everyone to try at home. So grab your polishes and tools, and get ready to show off your creative Christmas style!
Sources:


